Diskmaker X For Macos High Sierra
Run DiskMaker X (version 6 for Yosemite through Sierra; each subsequent release has its own dedicated app) to load the installer to the largest “Untitled” partition, remembering to select “Another kind of disk” so as not to wipe the entire drive. With the drive selected in Disk Utility.
DiskMaker X is an application built with AppleScript that you can use with many versions of OS X to build a bootable drive from macOS installer program (the one you download from the Mac App Store). As soon as you launch the application, it tries to find the macOS Install program with Spotlight.
Then, it proposes to build a bootable install disk and make it look as nice as possible. It’s the easiest way to build an macOS Installer in a few clicks !
You can use the Install drive to fully re-install the OS on a freshly formated drive, or install it on your many Macs without re-downloading the full installer.
Jump over the break to learn how to use DiskMaker X…
1. Get an an empty flash drive with at least 8GB of storage
2. Download High macOS Sierra from the Mac App Store
3. Download DiskMaker X
4. Double-click on the .dmg file to open it and drag-and-drop the DiskMaker X app into the Applications folder
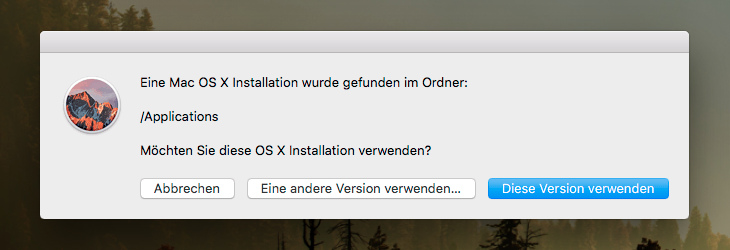
5. Now, the app will search for a copy of macOS High Sierra. Once it found your Sierra copy, it will ask you if you want to use the copy that it found or you want to use another copy. If you downloaded it from the app store ( step 2 ), choose ‘Use this copy’
6. The app will ask you about your thumb drive, and it will tell you that will be completely erased before copying macOS High Sierra onto it…
7. Now the app will format your flash drive and ask you for your admin password. Once you enter your admin password, DiskMaker X will start copying the necessary High Sierra files onto your flash drive.
NOTE: this process will take a while. You will be notified with each 10% completion via the macOS notification system. Be patient….
8. When you’re done, the app will tell you that the boot disk is ready, you’ll see that your flash drive has been renamed as macOS 10.13 Install Disk and it will be opened. Now all you have to do is restart your Mac and and after you here the chime sound, press the Option ( Alt ) key until you see the option to choose the flash drive to boot from.

SUPPORT
FSM has no ads or affiliate links. Your support would simply pay for our servers, domain and maintanance. If there's any leftover change, we'll get some coffee and a slice of pizza.| Liberapay | |
| Bitcoin (BTC) | 1Hfuq77gKKFJeNcq4EP4dQK3yDRWrFEwJR |
| Bitcoin Cash (BCH) | qzmdm6e6q5wf2p6sxz2mst7cenz60newwc5m4e9js8 |
| Ether (ETH) | 0x5f02869278C24A6579d3820f52AD15936D6F9d69 |
| Stellar (XLM) | GDWT2QU2CI3GZ5XH5DTSU3IUAHZMTB6VQKKRHBYWS5YCCQOAG6OKG2OB |
| More content? |
One of the many perks of Mac users that Windows users would never imagine of getting is free OS upgrade. Every time Apple releases the latest and greatest macOS, they always come with zero dollar price tag. That’s why the adoption rate of the latest macOS always goes through the roof. Who could resist the best OS in the planet for their Macs for free?
But unfortunately, the latest and greatest macOS doesn’t always mean the best for your machine, especially if your machine is old.
Even though your machine is still compatible with the latest macOS High Sierra, the older your Mac is, the more strain from macOS that it has to endure. That’s why it’s understandable that some people with older Macs might want to downgrade Sierra to El Capitan, or from High Sierra to Sierra.
How do you downgrade your macOS? And what if you don’t have Time Machine backups to help you?
How to Downgrade MacOS in Easy Steps
The easiest way to downgrade is to use the backup that you have in your Time Machine, and we will discuss it later. But if you don’t have one, you can use the process described below.
The steps that we’re about to discuss will be more or less the same even under different macOS. There would be slight differences in details, but they aren’t essential. So whether you are downgrading from Sierra to El Capitan or from High Sierra to Sierra, or lower, please make a printout or read this discussion on another device so you can do the steps while having the instructions handy.
Step 1: Back Up Your Current macOS
Since downgrading will erase the current macOS entirely, including the files, programs, or documents, it’s wise to back up your important files prior to starting the process. Use external hard drive or cloud-based storage services like Dropbox, OneDrive, or iCloud.
Step 2: Create Bootable Drive of the Previous macOS
If you are downgrading from Sierra to El Capitan, you need a bootable drive of El Capitan handy. But if you’re downgrading from High Sierra, you need Sierra.
Download the installer from AppStore, and use the help from DiskMaker X program to create the bootable disk.

Step 3: Erase the Current macOS
Now is the time to erase the macOS that is currently installed on your computer. If you are downgrading from Sierra to El Capitan, this is the time to erase Sierra. Here are the steps.
- 1. Connect your Mac to the internet via Wi-Fi or Ethernet.
- 2. Click on the Apple icon in the upper left corner of the screen.
- 3. Select Restart from the drop-down menu.
- 1. Hold down Command+R, and keep holding the keys until your computer reboots.
This will put your computer into Recovery Mode. - 2. Click on Disk Utility in the OS X Utilities selector.
- 3. Click Continue.
- 1. Select your Startup Disk.
- 2. Click on the Erase tab at the top of the window.
- 1. Enter a name for the file to be destroyed (Like macOS High Sierra or something).
- 2. Select Mac OS Extended (Journaled) from the format list.
- 3. Click Erase.
After the process is complete, quit Disk Utility from the drop-down menu in the upper left corner of the screen to go back to the OS X Utilities selector.
Step 4: Reinstall the Previous Version of macOS
After wiping out your current macOS installation, you need to reinstall the previous version of macOS. If you are downgrading from Sierra to El Capitan, this is the time to install El Capitan. You need to have your installation USB plugged in.
- 1. Connect your Mac to the internet via Wi-Fi or Ethernet.
- 2. Click on the Apple icon in the upper left corner of the screen.
- 3. Select Restart from the drop-down menu.
- 1. Hold down Option while your computer restarts. This will send you to the option to select a startup disk.
- 2. Select macOS El Capitan (or whatever the macOS that you want to install) from the list of startup disk options and it will begin installing on your Mac.
- 3. Click Continue in the installation window.
Just follow the process, and after it finishes, you’ll have your freshly installed Mac ready to roll.
The Easiest Way to Downgrade to Mac OS X EI Captitan
If you have a recent backup of your Mac, you can bypass those rather complicated process to revert to EI Captain.
- 1. Connect your Mac to the internet via Wi-Fi or Ethernet.
- 2. Click on the Apple icon.
- 3. Select Restart from the drop-down menu.
- 4. Hold down Command+R when you hear the startup chime and keep holding the keys until your computer reboots.
- 5. Select Restore from Time Machine Backup in the OS X Utilities selector.
- 6. Click Continue.
- 1. Click Continue after reading the important information about restoring from a backup.
- 2. Select the Backup source for where your Time Machine backup is stored.
- 3. Click Continue.
- 4. Select the most recent macOS Sierra backup on the drive.
- 5. Click Continue.
Best free editing app for mac. Then the restore process will begin. It could take a while, so you can sit back and relax.
Another Method to Backup and Recover
Apple’s Time Machine is not the only player in the data backup and recover field. Another recommended tool for the job is Tenorshare Data Recovery for Mac. This app is a complete Mac data recovery solution to recover all types of files from Mac's hard drive and other portable devices like USB flash drive, external hard drive, SD card, iPhone, etc. on macOS or mac OS X.